Understanding and Using the New Level-Based Permission System
Release Date: 13th December 2023
Video: Creating a permission Group for a Project
We are excited to announce the advanced level-based permission system. This feature, gives users the ability to have precise control over defining user access to modules and features within the application.
Key Highlights:
-
Customized Access Control:
- Create distinct permission groups tailored to your organization's specific requirements.
- Define access to modules and features, ensuring users have precisely the tools they need for their roles.
-
Refined Permission Settings:
- Customize access rights for different user roles, streamlining workflows and increasing efficiency.
- Tailor access based on organizational responsibilities, enhancing user productivity.
- Add Company Level permission groups to manage your organisations access across multiple projects.
-
Simplified Administration:
- Easily assign or modify permissions for individual users or user groups, reducing administrative complexities.
- Effortlessly manage access levels as organizational structures evolve.
-
Enhanced Security Measures:
- Restrict access to essential functionalities, bolstering data security and confidentiality.
- Ensure sensitive data is accessed only by authorized personnel.
Why can't I see the new permissions module?
If you can't see the module, you may not have the correct access to do so. Contact your obi administrator to adjust your access.
What will happen to my existing permissions?
Any permissions you have on existing projects have been copied over to the new access system, so you will still have access to all the features you need in obi.
Some project roles have been removed to make way for these new, easier to manage permission groups. You will notice that roles such as "Lead Designer", "Project Manager" and "Client Representative" are no longer available in obi, but the users in each role have been added to permission groups which correspond to the same access given by these roles.
For support from the obi team, you contact us through our Support Portal.
How It Works:
The level-based permission system provides a user-friendly interface for administrators to create, manage, and assign permission levels effectively.
Permissions are assigned on a 3 tier system for each module:
- General Permissions give the user the minimum access to a module to be able to complete their assigned tasks. Usually this will be "view only" access to project data, or their view will be limited to the records that are relevant to them.
- Privileged Permissions grant a higher level of access for more trusted users. This usually includes access to more of the project records, some ability to edit records, and perform additional functions such as bulk uploads or changing settings.
- Admin Permissions give the highest access to modules and should be reserved for Project Leaders. This grants the ability to amend or delete records, change workflow steps, or overwrite information added by other project users.
For full details of what these levels grant in every module, see the Permission Helper Table.
Company vs Project Level groups:
If you are an administrator for your company (set by a field in Company Details), you will be able to manage permissions for all users in your company when they are using company associated projects (ie. projects where your company is the "Client").

The "Company Level Group" Tab is only visible to company administrators and from here you can create, edit or remove company level groups. Add or remove users from groups to control their access levels for all your projects at once.
What is a Company Administrator?
The Company Administrator role defines the user who is tasked with managing permissions for their company. This person will have full access to all modules on company projects and will be able to grand company level permissions for any modules on company projects.
The Company Admin is set in the Company Details Page (Personnel>Companies>Select your company) and must be a person in that company. Multiple company admins can be assigned to a company if needed.

This is a new field in obi, so in order to leverage company permissions, you will need to assign at least one company admin. eg. Your company's Application Manager, IT Manager or Head of Security would all be a good fit for this role.
Project Level Permissions are available to any user with Admin level access in the "Project Admin" section.

These users will be able to manage permissions for all users on that project. The permission levels are independently set by module, and a user cannot grant permission to a module they don't have access to, so you can fully customise the experience of your project users, granting them only the access they need while keeping them away from modules they don't.
For example, you could grant your Lead Designer the ability to set up permission groups for their team, but if they only have access to the Design Management module, they will only be able to grant access for that module, and not the whole system.
Setting Up Permissions:
Accessing Permission Settings:
-
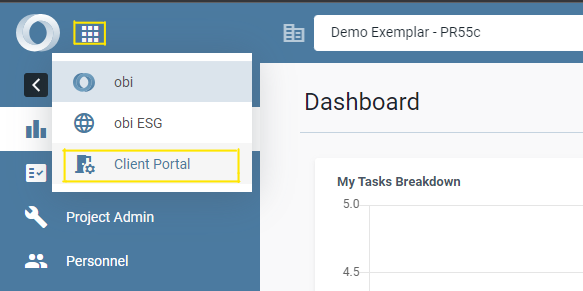
- Click on the "9 dots" icon at the top of any page to access the product picker. Select the "Client Portal" from the list of options. (If you use the ESG product you will see that here too.)

- You will be brought to the Permissions Manager page where you can navigate between Company and Project Level Permission Groups. (If you are not a "Company Admin" you will only see the "Project Level group" tab).

- In the Project Level group, you will see every Project where you have the access to manage permissions ("Admin" level in the "Project Admin" Module). If you have this access on a lot of projects, you can use the search bar to search by project name to find the one you need.
- Click on the "9 dots" icon at the top of any page to access the product picker. Select the "Client Portal" from the list of options. (If you use the ESG product you will see that here too.)
Creating Custom Permission Groups:
-
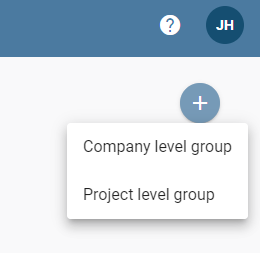
- Click on the "Plus" icon on the top right corner of the screen to add a new group.

-
- Choose to create a company or project level permission group. This will open the group creation page.

- Name the permission group
-

- Select the Project the group will be applied to (if creating a company level group, you will skip this step).

- Select the Project the group will be applied to (if creating a company level group, you will skip this step).
-
- Select the modules and features accessible to users within this level. For a detailed explanation of permission levels, see the Permissions helper table
-

- Choose the users to use this permission group. If you are creating a company level permission group, only users in your company will be available here.(Search by name or company abbreviation)
-

- Save your settings
Video: Creating a Company Level Permission Group
Video: Creating a Project Level Permission Group
Modifying Permissions:
Use the Controls on the Permission Group List to edit, duplicate or delete existing permission groups. 
Video: Permission Group Controls
Why It Matters:
The new permission system empowers organizations to create controlled, efficient environments within obi. By tailoring access based on roles, users gain access to functionalities essential for their responsibilities, enhancing productivity and reinforcing security measures.
Should you have any questions or need assistance, our support team is here to help.
Thank you for choosing obi. We're excited about this new feature and are confident it will bring immense value to your organization.